What to Expect During a Professional Network Cabling Installation
A professional network cabling installation is one of those projects that only gets noticed when it goes badly. When it is done well, the result feels almost invisible. Phones ring clearly, access points stay online, workstations connect at full speed, cameras record without interruption, and the IT team stops chasing mysterious dropouts that seem to move from room to room.
That quiet reliability does not happen by accident. It comes from planning, site conditions, material choices, careful workmanship, and testing that goes beyond plugging in a laptop and hoping for link lights. If you are preparing for a business network installation, especially in an office, warehouse, clinic, school, or mixed-use commercial space, it helps to know what the process looks like before technicians start opening ceilings and pulling cable.
The details vary from site to site, but most professional network cabling projects follow the same broad rhythm. There is a discovery phase, a design phase, the physical installation itself, then labeling, testing, cleanup, and documentation. The best contractors also spend time on the less glamorous parts of the work, such as pathway planning, bend radius control, separation from electrical circuits, and rack organization. Those details are what make structured cabling dependable years after the installer leaves.
It starts long before the first cable pull
Most clients picture the job beginning when technicians arrive with ladders, cable reels, and patch panels. In practice, the important decisions happen earlier.
A competent installer usually begins with a walkthrough. On a small office network cabling job, that may be a single visit to count drops, inspect ceiling space, locate the demarcation point, and review where the rack or wall-mounted cabinet will go. On a larger project, there may be several rounds of planning with IT staff, facilities managers, general contractors, and sometimes electricians or security integrators.
During that stage, the installer is looking for constraints that affect the final design. Ceiling type matters. Open ceilings are different from hard-lid spaces. Older buildings often hide surprises, such as crowded conduits, fire blocks, asbestos concerns, or pathways full of abandoned low voltage cabling from tenants who moved out years ago. Warehouses introduce another set of issues, including long cable runs, lift access, and temperature extremes near the roofline.
This is also the point where scope gets clarified. A phrase like “we need network drops in the new suite” sounds simple, but it can mean very different things. Are those data cabling runs for desks only, or are there printers, VoIP phones, cameras, access control readers, wireless access points, digital signage, and conference room systems as well? Does the client want basic connectivity, or room for future growth? Are there existing patch panels with spare capacity, or is a new rack build required?
Small misunderstandings here turn into change orders later. Good installers ask a lot of practical questions early because it is cheaper to solve layout problems on paper than after thirty cables have already been terminated.
Choosing the right cable type is not a minor detail
One of the first conversations usually involves cable category. For many office environments, CAT6 cabling remains a common choice. It supports gigabit networking comfortably and can support higher speeds over shorter distances, depending on equipment and run length. CAT6A cabling often enters the discussion when the client wants more headroom, better performance for 10-gigabit applications, or stronger immunity to alien crosstalk in denser environments.
The right answer depends on the building, the applications, and the budget. In a modest office with typical workstation traffic and standard access points, CAT6 may be entirely appropriate. In a new build where the walls will not be opened again for a decade, many owners choose CAT6A cabling to avoid revisiting the same infrastructure too soon. Healthcare spaces, campuses, media environments, and facilities with high-density wireless often lean toward higher-performance cabling because the labor to install it is the expensive part. The difference in material cost can be easier to justify when compared with the disruption of replacing it later.
There are trade-offs. CAT6A is thicker, less flexible, and sometimes more demanding to route cleanly through full pathways. It can require larger cable management, bigger bend radii, and more attention in tightly packed telecommunications rooms. A good installer explains those realities instead of treating every job like a sales pitch for the highest category available.
The site survey reveals what the drawings do not
Even if floor plans exist, field conditions usually shape the final installation. I have seen clean architectural drawings suggest a tidy route from closet to workstation, only for the field team to find steel beams, inaccessible soffits, sealed firewalls, and HVAC congestion exactly where the cable was supposed to go.
That is why a proper site survey matters. During the survey, the installer verifies distances, identifies cable pathways, evaluates wall construction, checks whether sleeves or conduits already exist, and confirms where outlets can actually be placed. This is also when they should determine whether lifts are required, whether after-hours access is necessary, and whether portions of the work must be coordinated with other trades.
If the project includes low voltage cabling beyond standard data drops, such as cameras, intercoms, or access control devices, the survey often gets more detailed. Camera mounting height, line of sight, outdoor exposure, and power needs all affect routing. Wireless access points may need central ceiling locations that require special support hardware or plenum-rated pathways. In conference rooms, one floor box in the wrong spot can create an awkward finished space even if the cable itself is technically correct.
A thorough survey usually saves the client money. It reduces idle labor, limits mid-project surprises, and improves the quality of the final network cabling installation.
What the installation day actually looks like
On the first day of physical work, the crew typically arrives with materials staged according to the approved scope. That can include bulk cable, j-hooks or pathway supports, faceplates, keystones, patch panels, rack hardware, cable managers, Velcro ties, labels, and testing equipment. On more complex jobs, they may also bring core drilling gear, fish tape, lifts, or specialty tools for difficult pathways.
The first visible activity is often setup and protection. Professional crews do not rush straight into pulling cable. They identify work areas, protect finishes where needed, confirm access to telecom rooms, and check that the intended routes are still clear. In active offices, they may coordinate around meetings or sensitive departments. In medical or education settings, access windows can be narrow and strict.
Then comes pathway preparation. This part rarely gets much attention from clients, but it is one of the best indicators of quality. Cables should not simply be tossed over a ceiling grid or draped across ductwork. Proper structured cabling relies on supported pathways, clean routing, and separation from sources of interference. If a space has no suitable pathway, the installer may need to add hangers, j-hooks, conduit, sleeves, or surface raceway before any cable is pulled.
Once the routes are ready, the actual cable pulling begins. In a typical office network cabling project, technicians pull multiple runs in bundles from the telecom room to work areas, taking care not to exceed tension limits or damage the cable jacket. This is especially important with higher-performance ethernet cabling. Excessive force, kinks, or crushed cable can reduce performance even when the termination looks fine later.
Experienced crews keep bundles organized as they move through the building. https://wiringexpert554.scriblorax.com/posts/office-network-cabling-requirements-for-high-density-workstations Good cable work has a rhythm to it. Drops are grouped logically, pathways stay neat, and service loops are controlled rather than excessive. Sloppy pulls often create problems downstream, especially in crowded racks where unlabeled or tangled bundles become expensive to troubleshoot.
Expect some disruption, but not chaos
Even a well-run project creates some inconvenience. Ceiling tiles come down. Ladders appear in hallways. Access to a room may be limited for a period of time. There may be drilling noise, especially where pathways need to cross fire-rated walls or where surface raceway is being installed on finished walls.
That said, a professional team works to contain the disruption. In occupied offices, crews often stage messy work before staff arrive, reserve noisy tasks for approved windows, and leave pathways and common areas clear at the end of the day. If the job is large, it may be broken into zones so departments can keep operating while work shifts around them.
A few practical preparations make the process smoother:
- Confirm who can authorize field decisions if the crew finds an obstacle or a better route.
- Clear access to telecom closets, work areas, and ceiling hatches before the team arrives.
- Notify staff about temporary noise, room access limits, and any after-hours work.
- Identify sensitive spaces early, such as executive offices, labs, exam rooms, or recording areas.
- Decide in advance how furniture moves, key access, and alarm disarming will be handled.
Clients sometimes underestimate how much time can be lost waiting for keys, moving boxed inventory, or getting approval to enter a locked suite. On a one-day job, those delays are frustrating. On a large project, they can affect the entire schedule.
Termination is where craftsmanship becomes visible
After cables are pulled, they have to be terminated cleanly at both ends. This is where the project starts to look finished.
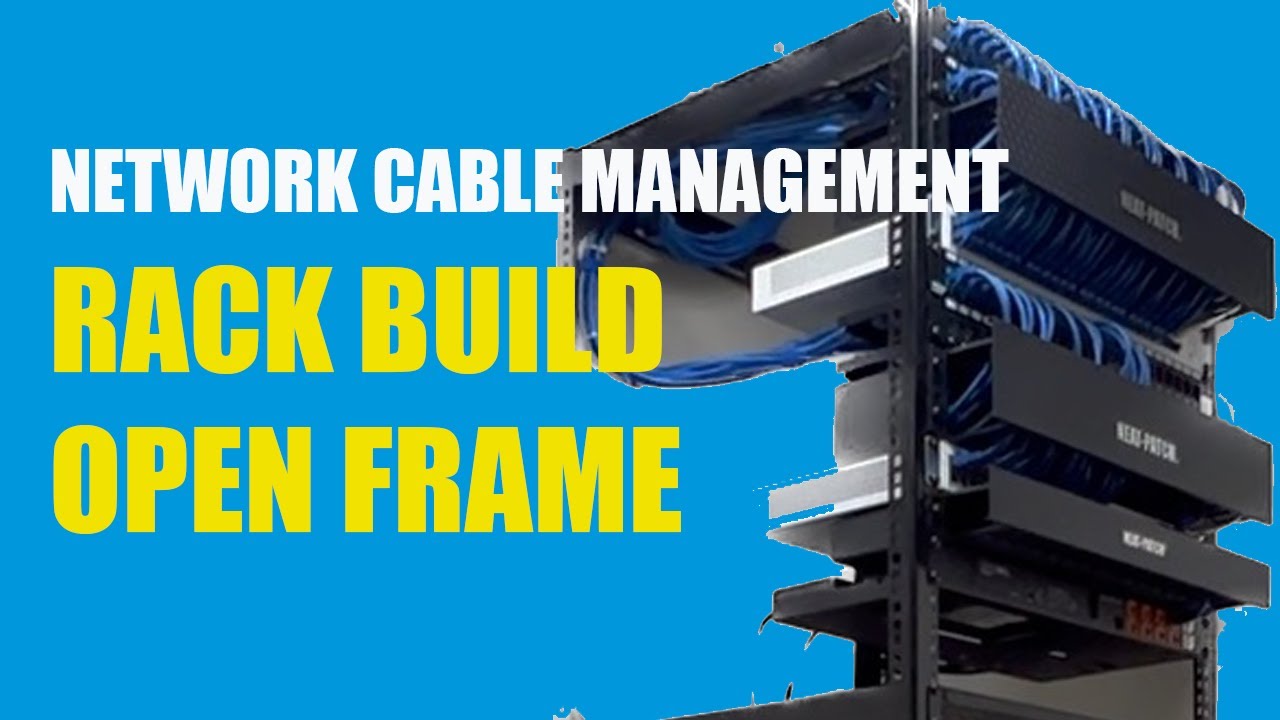
In work areas, that usually means keystone jacks mounted in wall plates, floor boxes, modular furniture outlets, or surface raceway boxes. In the telecom room, cables are commonly terminated on patch panels mounted in a rack or cabinet. If the site includes voice, data, cameras, wireless access points, or other systems, the rack layout should reflect that clearly rather than mixing everything together in a way that only the original installer can decipher.
This step is more technical than it may appear. Pair twists should be maintained close to the termination point. Jacket strip length should be appropriate. Cable should be dressed so that it is supported and strain-free. A neat termination is not just cosmetic. It helps preserve performance and makes future maintenance much easier.
A well-built rack tells you a lot about the installer. Patch panels should be aligned. Horizontal and vertical cable managers should actually be used. Patch cords should not be stuffed into the side of the cabinet. Power should be separated sensibly from data. Labeling should be visible without forcing someone to trace a cable by hand. If the project includes switches, UPS units, or fiber shelves, space planning matters even more.

I have walked into telecom rooms where every port worked on day one, but six months later a simple move-add-change became a half-day puzzle because nothing was labeled properly. That is the hidden cost of rushed work.
Testing is not optional
One of the clearest differences between a professional network cabling installation and a casual one is testing. Plugging a device into a jack and seeing a link light proves very little. It does not verify that the run meets category performance, that all pairs are correctly terminated, or that the cable will support the application it was installed for.
Professional installers use certification or qualification testers depending on project requirements. Certification is the stronger standard for new structured cabling. It measures performance against the category being installed and checks for issues such as wiremap faults, excessive length, insertion loss, return loss, and crosstalk problems. Qualification testing is more application-focused and may be appropriate in some upgrade scenarios, but for new commercial data cabling, certification is generally what clients should expect if they want confidence in the system.
Testing often uncovers issues that are not visible to the eye. A cable might be nicked above a ceiling. A pair might be untwisted too far at a jack. A run might have been routed too close to a source of interference. A patch panel punch might not be fully seated. Good crews expect a few failures on a substantial project and correct them methodically before turnover.
If a contractor says testing is unnecessary because “we checked them with a laptop,” that is a warning sign.
Firestopping, codes, and safety often get overlooked by clients
Some of the most important work in network cabling happens in places the client may never inspect closely. Cables that pass through rated walls or floors may require approved firestopping. Plenum spaces may require plenum-rated cable. Support methods have to meet code and site requirements. Cables should not be tied to sprinkler pipe, laid on ceiling tile grids, or supported by whatever happens to be overhead.
These details matter for safety, compliance, and liability. They also matter during future inspections, renovations, or lease turnovers. Building owners and facility managers tend to remember the contractor who left a clean, compliant low voltage cabling installation, and they definitely remember the one who did not.
If your project is in a regulated environment, such as healthcare, education, government, or industrial space, ask early about the standards and site policies that apply. A professional installer should be comfortable discussing them.
The final walkthrough should answer more than “does it work?”
By the time the project reaches handoff, the visible labor is mostly done. What remains is just as important. The client should receive a clear explanation of what was installed, where it was installed, and how to maintain it.
That handoff often includes a walkthrough of the telecom room, selected outlet locations, wireless access point placements, and any special routing or access notes. If there were field changes from the original plan, those should be documented. If the installation supports future growth, the client should know where spare capacity exists, whether in patch panels, rack space, pathway fill, or conduit reserve.
A strong closeout package usually includes:
- A labeled port map or as-built documentation showing outlet and patch panel IDs.
- Test results for the installed cabling, especially for new CAT6 cabling or CAT6A cabling.
- Notes on cable pathways, firestopped penetrations, and any site-specific access considerations.
- Warranty information for labor and, where applicable, manufacturer-backed cabling systems.
- Recommendations for patching, rack maintenance, and future expansion.
This documentation becomes valuable faster than most people expect. Someone moves desks. A new access point is added. A switch gets replaced at 7:30 on a Monday morning. Good records turn those moments into routine tasks instead of detective work.
How long the project takes, and what affects the timeline
Clients often ask for a simple time estimate, but network cabling timelines depend on access, building complexity, number of drops, pathway conditions, and how much coordination is required with other trades.
A small office with a dozen straightforward ethernet cabling drops might be completed in a day or two. A midsize tenant improvement with new racks, patch panels, wireless access points, and several dozen workstations may take several days to a couple of weeks. A warehouse, school, or medical facility can stretch longer because the work is physically larger and often constrained by operating hours or specialized site rules.
The biggest schedule variables are usually not the cable pulls themselves. They are access issues, unfinished construction, congested pathways, permit or inspection delays, and scope changes discovered after the job begins. That is why realistic planning matters more than optimistic promises.
What separates average work from excellent work
To a nontechnical eye, many installations look similar on the day they finish. Faceplates are in place, patch panels are mounted, and everything appears connected. The real differences show up later.
Excellent structured cabling ages well. Labels remain readable. The rack still makes sense after several rounds of adds and changes. Patching can be done without tracing mystery cables. Wireless and PoE devices remain stable. Switch upgrades happen without uncovering cabling surprises. When the business grows, the infrastructure supports it instead of fighting it.
Average work tends to reveal itself under stress. Ports fail intermittently. A camera drop negotiates inconsistently. A conference room jack never quite performs as expected. The telecom room becomes harder to manage every quarter. The cost of those problems often exceeds whatever was saved by choosing the cheapest installer.
If you are evaluating a contractor, ask to see photos of recent office network cabling or business network installation projects. Ask how they label, test, document, and firestop. Ask whether they certify every run. Ask what category they recommend and why. The quality of the answers usually tells you as much as the bid.
What you should feel at the end of the project
By the end of a professional network cabling installation, you should not feel like you simply bought cable. You should feel that the physical foundation of your network was built with care.
The work area outlets should be placed where people can use them without improvising. The rack should be understandable. The test results should exist and be organized. The pathways should look intentional, not accidental. The documentation should allow your IT team, internal facilities staff, or future vendor to make changes without starting from scratch.
When network cabling is installed properly, it disappears into the background of daily business, and that is exactly the point. The phones, computers, cameras, wireless access points, and other systems people rely on every hour of the day need a dependable physical layer beneath them. A professional installer is not just pulling wire. They are building that layer so it performs now, remains serviceable later, and does not become the weak link in everything connected to it.
Fontana Tech Pros provides professional network cabling installation, structured cabling, fiber optic installation, commercial WiFi, access control, security camera installation, alarm systems, and phone system solutions for businesses throughout Southern California. Learn more at https://fontanatechpros.com/.
Fontana Tech Pros specializes in reliable network cabling solutions for commercial offices, warehouses, schools, and industrial facilities. Our experienced team delivers high-quality structured cabling and low-voltage installations designed for long-term performance.